Using the MS Word Equation Editor
This page contains a quick and easy guide to using MS Word’s equation editor. It includes getting started, formatting
and aligning at the = sign, together with other tips and tricks. Other pages include templates and further guides.


MS Word Equation Editor
Microsoft Word Equation Editor - Starting
The Word equation editor can be a little tricky to find, but with the latest version it can be found by clicking on Insert from
the top menu and then expanding the Word window to its maximum. It should then appear looking like this near the top-
right of the Word window:
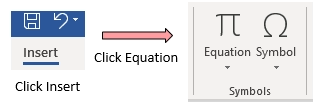
It can also be found by clicking on Symbols on the top-right of the window and choosing Equation from the drop-down
menu.
In both cases, when you click on Equation you will normally want to choose Insert New Equation from near the bottom of
the drop-down menu. Generally speaking, you won’t be interested in the “Built-in” equations offered, so just choose
Insert New Equation from the bottom of the drop-down menu if it appears.
Do this and try inserting something simple, such as 3 + 5 = 8. We’re on our way…
First tips and tricks - symbols, size and left justifying
Let’s try something a little more interesting. Add a new equation and enter 5 x 3 = 15. Did it look like this?

Note the italic letter x, instead of a multiplication symbol. This is a very common error, but easily corrected.
From the top menu click on the button shown below (you may need to click Equation up at the top-right of the window
first):
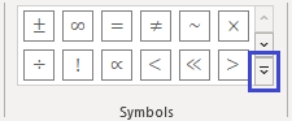
Using the mouse, carefully highlight the letter x in the equation. Now, from the top menu click on the button shown below
(as above, you may need to click Equation up at the top-right of the window first). You will see a drop down menu at the
top-right of the drop-down box. Make sure it’s set to Basic Math, then find and click X. Problem sorted…
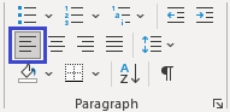
Now we’ll left-justify our equation. Click anywhere away from the equation, and then highlight the whole equation block.
Click Home from the top menu, and then click the left justify icon:
Finally, we’ll re-size the equation. Make sure the equation is highlighted and that you are in Home from the top menu.
Then simply change the font size from the top menu the way you would for any normal text. We now have something
that is correctly formatted, in the size we want and in the right place.
Aligning at the equals sign
We will now look at how to enter equations on more than one line and then how to align what we have entered at the
equals sign.
To add a new line: place the cursor at the end of the line you are working on, hold down Shift and press Enter. A new
line will be added with a box saying Type equation here. Enter your new working and repeat as necessary. Here’s an
example of the results:
Advertisement
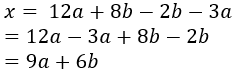
So far so good. Now let’s align the work at the equals sign. To do this, highlight the whole equation block, right click and
from the drop-down menu choose Align at =. Here’s the new version of the equation after this has been done:
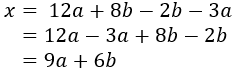
The equation is now better presented and a little easier to follow.
Final words
This is just a quick guide to some of the features of the editor. It really can be fiddly and frustrating at first, but with a little
practise soon become almost second nature. Here are a couple of tips:

If you’re not sure how to do something save your work and then try experimenting. For
example, try highlighting a number or letter in your equation and choosing from the Fraction,
Script or Radical menus near the top of the screen.
Start a document called Templates and copy some of your equations to it. That way you will
build a library of well-formatted equations that can simply be copied, pasted and amended in
your future work. A small collection of downloadable templates can be found here.
Advertisement

MS Word Equation Editor
Using the MS Word Equation Editor
This page contains a quick and easy guide to using MS Word’s
equation editor. It includes getting started, formatting and
aligning at the = sign, together with other tips and tricks. Other
pages include templates and further guides.
Microsoft Word Equation Editor - Starting

The Word equation editor can be a little tricky to find, but with
the latest version it can be found by clicking on Insert from the
top menu and then expanding the Word window to its
maximum. It should then appear looking like this near the top-
right of the Word window:
It can also be found by clicking on Symbols on the top-right of the
window and choosing Equation from the drop-down menu.
In both cases, when you click on Equation you will normally want
to choose Insert New Equation from near the bottom of the drop-
down menu. Generally speaking, you won’t be interested in the
“Built-in” equations offered, so just choose Insert New Equation
from the bottom of the drop-down menu if it appears.
Do this and try inserting something simple, such as 3 + 5 = 8.
We’re on our way…
First tips and tricks - symbols, size and left justifying
Let’s try something a little more interesting. Add a new equation
and enter 5 x 3 = 15. Did it look like this?
Note the italic letter x, instead of a multiplication symbol. This is a
very common error, but easily corrected.
From the top menu click on the button shown below (you may
need to click Equation up at the top-right of the window first):
Using the mouse, carefully highlight the letter x in the equation.
Now, from the top menu click on the button shown below (as
above, you may need to click Equation up at the top-right of the
window first). You will see a drop down menu at the top-right of
the drop-down box. Make sure it’s set to Basic Math, then find
and click X. Problem sorted…
Now we’ll left-justify our equation. Click anywhere away from
the equation, and then highlight the whole equation block. Click
Home from the top menu, and then click the left justify icon:
Finally, we’ll re-size the equation. Make sure the equation is
highlighted and that you are in Home from the top menu. Then
simply change the font size from the top menu the way you
would for any normal text. We now have something that is
correctly formatted, in the size we want and in the right place.
Aligning at the equals sign
We will now look at how to enter equations on more than one line
and then how to align what we have entered at the equals sign.
To add a new line: place the cursor at the end of the line you are
working on, hold down Shift and press Enter. A new line will be
added with a box saying Type equation here. Enter your new
working and repeat as necessary. Here’s an example of the
results:
So far so good. Now let’s align the work at the equals sign. To
do this, highlight the whole equation block, right click and from
the drop-down menu choose Align at =. Here’s the new version
of the equation after this has been done:
The equation is now better presented and a little easier to follow.
Final words
This is just a quick guide to some of the features of the editor. It
really can be fiddly and frustrating at first, but with a little practise
soon become almost second nature. Here are a couple of tips:
If you’re not sure how to do something save your work and
then try experimenting. For example, try highlighting a
number or letter in your equation and choosing from the
Fraction, Script or Radical menus near the top of the screen.
Start a document called Templates and copy some of your
equations to it. That way you will build a library of well-
formatted equations that can simply be copied, pasted and
amended in your future work. A small collection of
downloadable templates can be found here.